

TEKKEN8 Lidia Sobieska Main Techniques
・TEKKEN8 TOP
This guide features beginner-friendly key moves for Lidia in TEKKEN 8. Easy to learn and effective in real matches, these tools help you play confidently even if you’re just getting started.
Main Techniques video
Main Techniques Moves
1.Heat activation / Heat Dash can be activated / Few openings
| Explanation | Note |
|---|---|
| b1 |

2.Heat activation / Heat Dash can be activated / Quick attack
| Explanation | Note |
|---|---|
| f1+2,3,1+2 |

3.Combo starter / Can move first on block
| Explanation | Note |
|---|---|
| During Heat b1,F | Increased chip damage on block as an effect of Heat Dash |

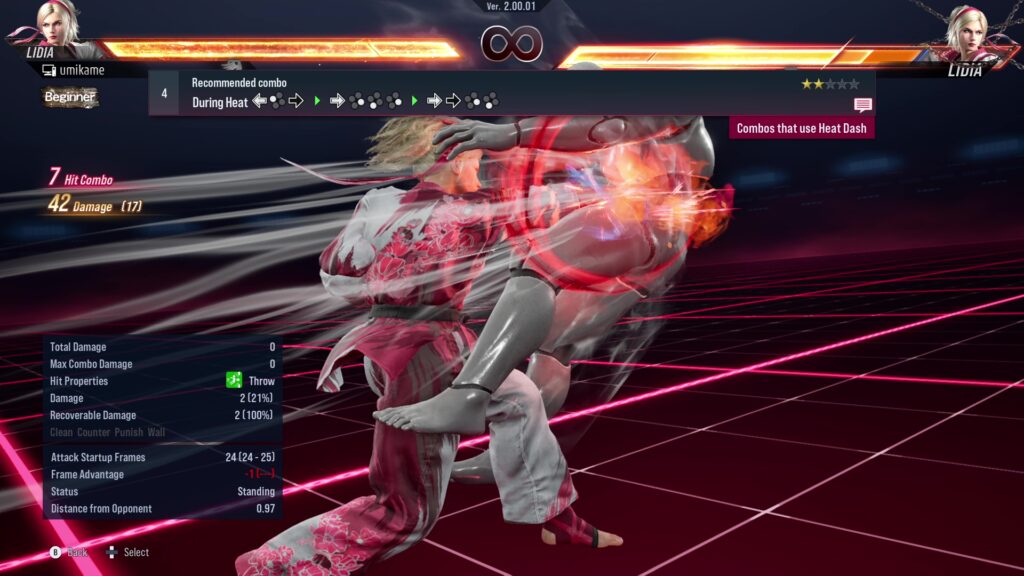
4.Recommended combo
| Explanation | Note |
|---|---|
| During Heat b1,F[HD]→f4,3,4 T!→ff4,3 | Combos that use Heat Dash |
5.Effective on opponents using an attack after blocking
| Explanation | Note |
|---|---|
| During Heat 2+3[Block]→during Heaven and Earth 2 | Heat Smash / Attack sequence using Heaven and Earth |

6.Effective on opponents using Standing Block / Heavy damage
| Explanation | Note |
|---|---|
| During Heat 2+3[Block]→during Heaven and Earth 1+2 | Heat Smash / Attack sequence using Heaven and Earth |

7.Combo starter / Effective on crouching opponents
| Explanation | Note |
|---|---|
| ff3 | Jump Status |

8.Recommended combo
| Explanation | Note |
|---|---|
| ff3→df4,2 T!→1+2 |

9.Effective on opponents using Standing Block / Heavy damage on counter hit
| Explanation | Note |
|---|---|
| d3,1,2 | Third attack hits when first attack is a counter hit |

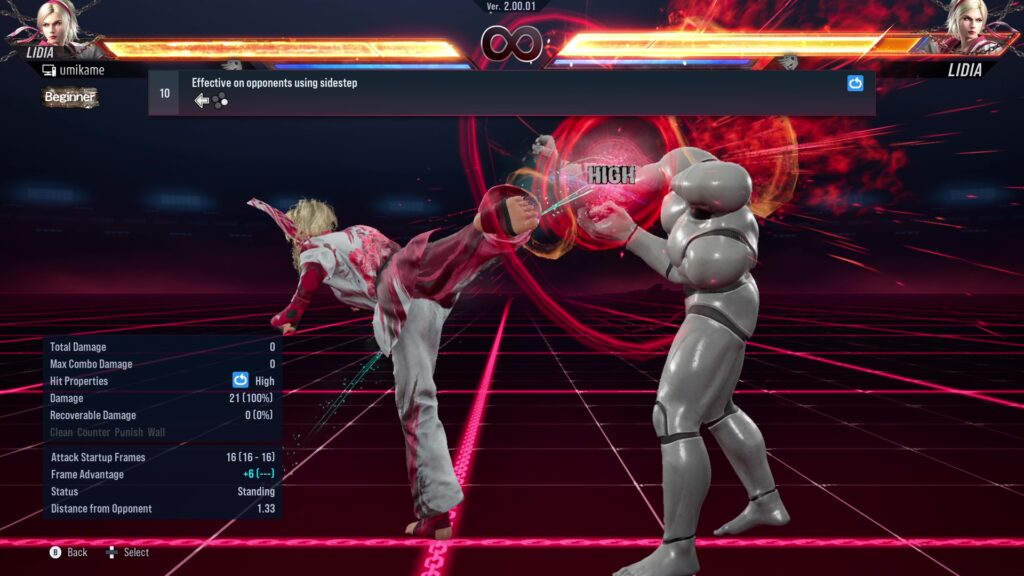
10.Effective on opponents using sidestep
| Explanation | Note |
|---|---|
| b4 |
11.Effective on opponents using a high or mid attack
| Explanation | Note |
|---|---|
| b1+2 |

12.Can approach from a distance / Heavy chip damage on block / Can move first on block
| Explanation | Note |
|---|---|
| fff1 |

13.Effective on opponents using Standing Block after a hit
| Explanation | Note |
|---|---|
| 1,2,2[Hit]→during Cat Stance 4[Hit]→during Stalking Wolf Stance 4 | Attack sequence using Cat Stance and Stalking Wolf Stance |

14.Effective on crouching opponents after a hit
| Explanation | Note |
|---|---|
| 1,2,2[Hit]→during Cat Stance 1 | Attack sequence using Cat Stance |

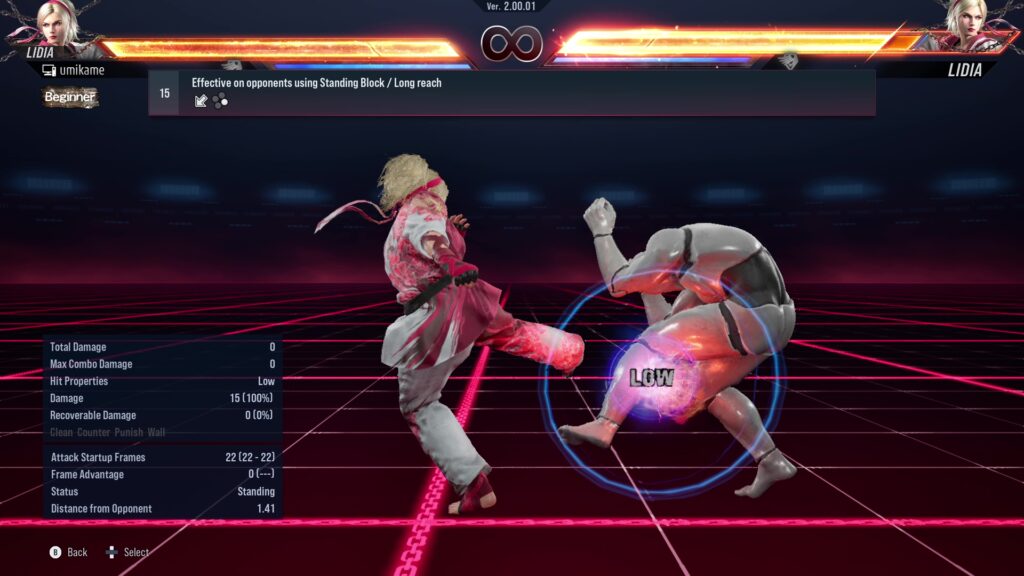
15.Effective on opponents using Standing Block / Long reach
| Explanation | Note |
|---|---|
| db4 |
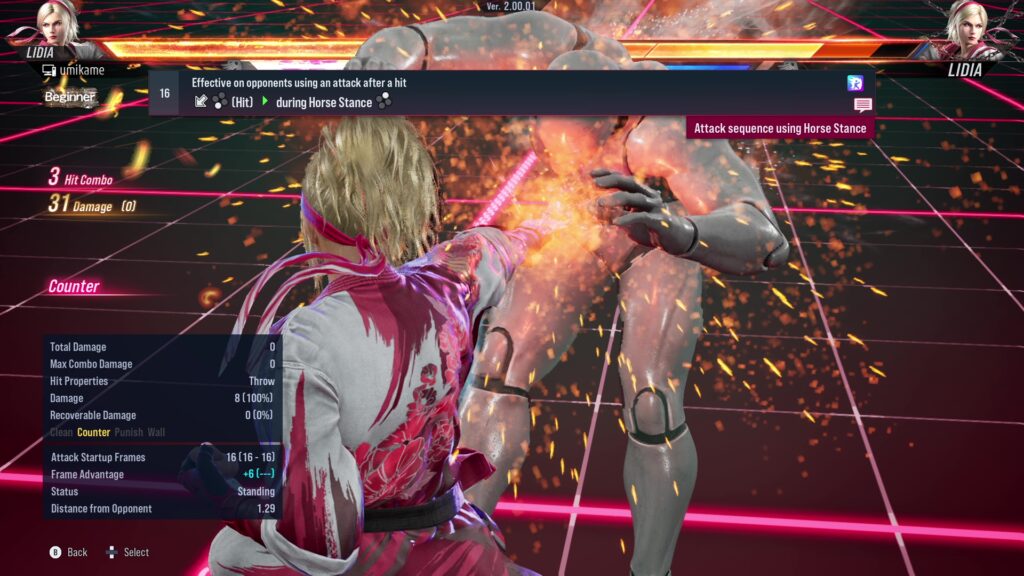
16.Effective on opponents using an attack after a hit
| Explanation | Note |
|---|---|
| db3[Hit]→during Horse Stance 2 | Attack sequence using Horse Stance |
17.Effective on opponents using Standing Block after a hit
| Explanation | Note |
|---|---|
| db3[Hit]→during Horse Stance 4[Block]→during Stalking Wolf Stance 4 | Attack sequence using Horse Stance and Stalking Wolf Stance |

18.Effective on opponents using an attack after blocking
| Explanation | Note |
|---|---|
| f3+4→during Horse Stance 4[Block]→during Stalking Wolf Stance 2 | Attack sequence using Horse Stance and Stalking Wolf Stance |

19.Effective on opponents using a high or mid attack after blocking
| Explanation | Note |
|---|---|
| ff2[Block]→during Horse Stance 1 | Attack sequence using Horse Stance |

20.Can approach from a distance / Quick attack / Heavy damage
| Explanation | Note |
|---|---|
| During Heat ff2[Hit]→during Horse Stance 2 | Combo using Horse Stance |


コメント