
TEKKEN8 Marshall Law Main Techniques
・TEKKEN8 TOP
This guide highlights the essential moves of Marshall Law in TEKKEN 8, perfect for beginners. Featuring fast and safe pokes, powerful Heat-activating attacks, and high-damage counter-hit tools, each move is explained with visuals and embedded video. Learn the go-to techniques to dominate neutral and pressure your opponents effectively. Mastering these core moves will give you a solid foundation to level up your Law gameplay.
Main Techniques video
Main Techniques Moves
1.Heat activation / Heat Dash can be activated / Heavy damage on counter hit
| Explanation | Note |
|---|---|
| 1,1,1 | Third attack hits when first attack is a counter hit |

2.Heat activation / Heat Dash can be activated / Effective on opponents using a low attack
| Explanation | Note |
|---|---|
| uf3 | Jump Status |

3.Combo starter / Can move first on block
| Explanation | Note |
|---|---|
| During Heat uf3,F | Increased chip damage on block as effect of Heat Dash |

4.Recommended combo
| Explanation | Note |
|---|---|
| During Heat uf3,F[HD]→UF4,3 T!→ff3 | Combos that use Heat Dash |

5.Heavy damage / Effective on opponents using Standing Block
| Explanation | Note |
|---|---|
| During Heat 2+3[Block]→during Dragon Charge DF3 | Heat Smash / Attack sequence using Dragon Charge |

6.Long reach / Quick attack / Combo starter
| Explanation | Note |
|---|---|
| During Heat 1+2 | Effects during Heat[unique] |

7.Combo starter / Few openings
| Explanation | Note |
|---|---|
| df2 |

8.Recommended combo
| Explanation | Note |
|---|---|
| df2→b2,1 T!→3+4,4 |

9.Combo starter / Effective on crouching opponents / Effective on opponents using a low attack
| Explanation | Note |
|---|---|
| UF4,3 | Jump Status |

10.Recommended combo
| Explanation | Note |
|---|---|
| UF4,3 T!→ff2,1,3 |

11.Effective on opponents using Standing Block / Few openings / Can move first on hit
| Explanation | Note |
|---|---|
| db3 |

12.Effective on opponents using Standing Block / Effective on opponents using sidestep / Effective on opponents using a high attack
| Explanation | Note |
|---|---|
| db4,4 |

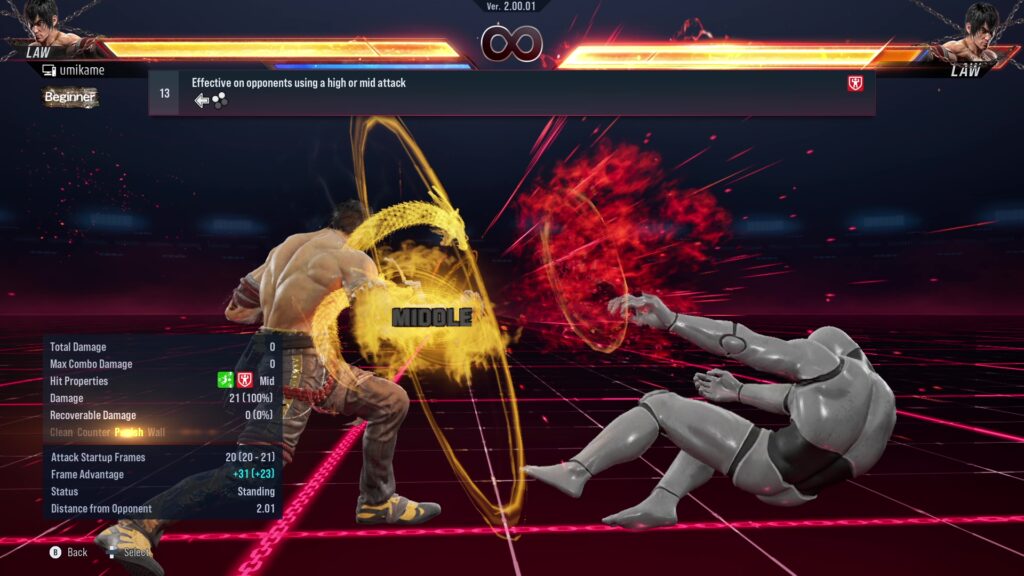
13.Effective on opponents using a high or mid attack
| Explanation | Note |
|---|---|
| b1+2 |
14.Effective on opponents using sidestep
| Explanation | Note |
|---|---|
| b4,3 |

15.Good for getting a counter hit on block / Heat activation / Heat Dash can be activated
| Explanation | Note |
|---|---|
| f3,2,F[Block]→during Dragon Charge 1→during Dragon Charge f1 | Attack sequence using Dragon Charge |

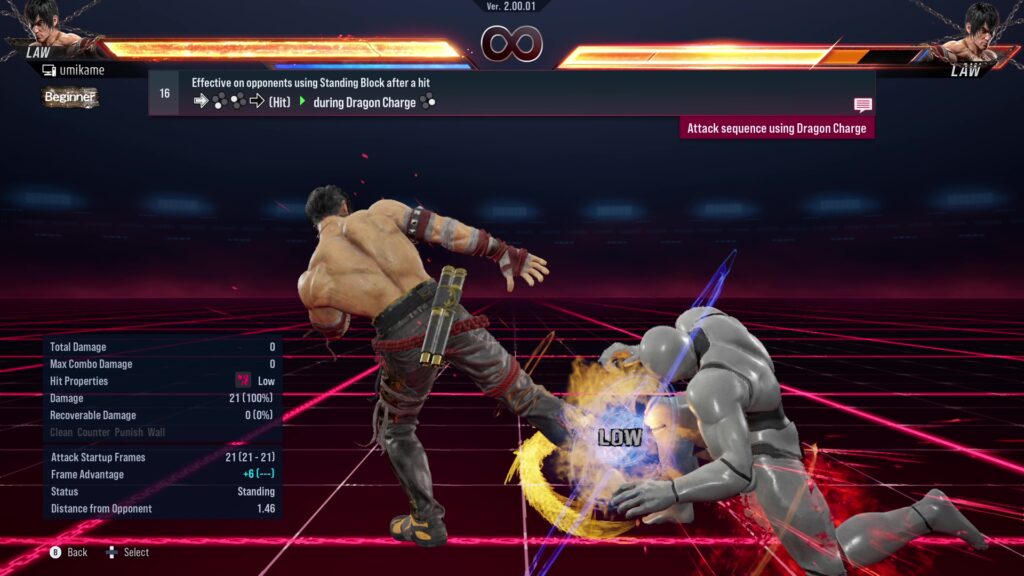
16.Effective on opponents using Standing Block after a hit
| Explanation | Note |
|---|---|
| f3,2,F[Hit]→during Dragon Charge 4 | Attack sequence using Dragon Charge |
17.Effective on crouching opponents after a hit / Heat activation / Heat Dash can be activated
| Explanation | Note |
|---|---|
| f3,2,F[Hit]→during Dragon Charge f3 | Attack sequence using Dragon Charge |


コメント